This page describes how to visualise tunnels and other cavities connected to the "outside world" using Uppsala software. The procedure is illustrated using the structure of cellobiohydrolase I (PDB entry 1CEL, chain A).
This may not be necessary, of course. In this case, we will cut out the protein chain A only from PDB entry 1CEL with MOLEMAN2:
 ----- EXAMPLE ----- EXAMPLE ----- EXAMPLE ----- EXAMPLE ----- EXAMPLE -----
 MOLEMAN2 > read 1cel.pdb
 MOLEMAN2 > sel all
 MOLEMAN2 > sel and type prot
 MOLEMAN2 > sel and chain a
 MOLEMAN2 > wr cbh1.pdb pdb selected
 ----- EXAMPLE ----- EXAMPLE ----- EXAMPLE ----- EXAMPLE ----- EXAMPLE -----
This can be done with VOIDOO:
 ----- EXAMPLE ----- EXAMPLE ----- EXAMPLE ----- EXAMPLE ----- EXAMPLE -----
 Type of calculation (C/V/R)           ? (C) v
 Do you want extensive output          ? (N)
 PDB file name ? (in.pdb) cbh1.pdb
 Primary grid spacing (A) ? (   1.000)
 Probe radius (1.4 A for water) ? (   0.000) 1.4
 Nr of volume-refinement cycles        ? (         10)
 Grid-shrink factor                    ? (   0.900)
 Convergence criterion (A3)            ? (   0.100)
 Convergence criterion (%)             ? (   0.100)
 Create protein-surface plot file      ? (N) y
 Dots, Old-EZD or New-EZD (D/O/N)      ? (N) n
 Name of this file                     ? (protein.ezd)
 Grid spacing to use                   ? (   0.700) 0.5
 ----- EXAMPLE ----- EXAMPLE ----- EXAMPLE ----- EXAMPLE ----- EXAMPLE -----
Note that we used a probe radius of 1.4 Å, so we will get the solvent-accessible surface of the protein. This also implies that the tunnel will become the complement of the solvent-accessible surface ! If you like, you could experiment with other values. Note also that we use a fairly fine grid (0.5 Å spacing). If you use a finer/coarser grid, you may have to modify the MAMA macro (discussed below) so that it does more/fewer cycles of "expand oldmask" and "contract oldmask" (if you change this, makew sure you use the same number of expand and contract cycles).
This can be done with MAPMAN:
 ----- EXAMPLE ----- EXAMPLE ----- EXAMPLE ----- EXAMPLE ----- EXAMPLE -----
 MAPMAN > re map protein.ezd ezd
 MAPMAN > wr map protein.mask mask 0.5
 ----- EXAMPLE ----- EXAMPLE ----- EXAMPLE ----- EXAMPLE ----- EXAMPLE -----
This we will do with MAMA, using Delaney's algorithm. A special MAMA macro (cavities.mamac) to do this can be found in the OMAC directory. Okay, let's run MAMA and use this macro:
 ----- EXAMPLE ----- EXAMPLE ----- EXAMPLE ----- EXAMPLE ----- EXAMPLE -----
 MAMA > @omac/cavities.mamac
 File name ? (not_defined) protein.mask
 [...lots of calculations...]
 Which file ? (OLDMASK) tunnel.mask
 ----- EXAMPLE ----- EXAMPLE ----- EXAMPLE ----- EXAMPLE ----- EXAMPLE -----
Now, do not quit from MAMA just yet. First inspect the mask to see if really contains the tunnel you hoped to find ! You can either contour the maks file in O, or look at the VRML file produced by the macro (called "mama.wrl"):
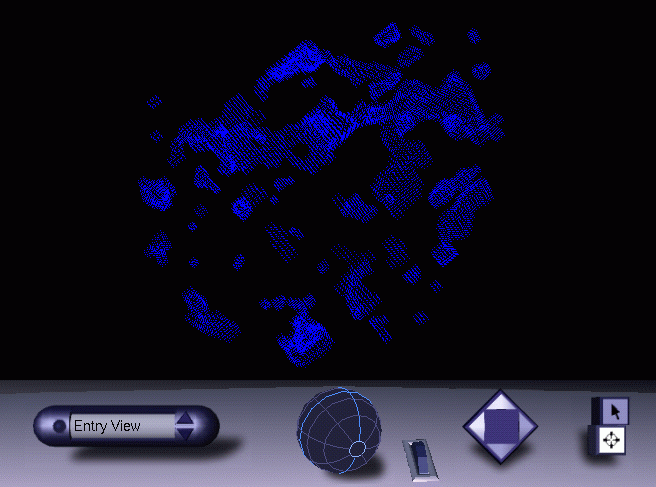
Well, that looks promising ! What we have to do next is to get rid of all the smaller cavities and invaginations detected by Mama Delaney. This can be done with one command in MAMA:
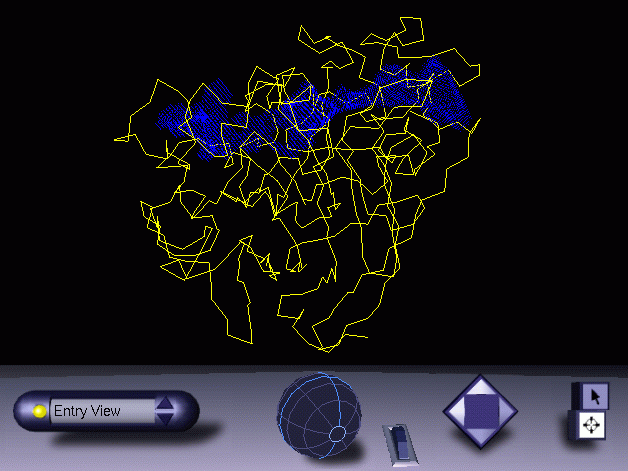
 ----- EXAMPLE ----- EXAMPLE ----- EXAMPLE ----- EXAMPLE ----- EXAMPLE -----
 MAMA > island oldmask
 [...this takes a while...]
 [...when done, save the mask and, optionally, create a new VRML file...]
 MAMA > wr oldmask tunnel.mask
 MAMA > vrml init
 MAMA > vrml dot oldmask blue
 [...you can also add the CA trace of your molecule to the VRML file...]
 MAMA > vrml trace cbh1.pdb yellow
 ----- EXAMPLE ----- EXAMPLE ----- EXAMPLE ----- EXAMPLE ----- EXAMPLE -----
Now, do still not quit from MAMA just yet. Check the mask file in O again (or the VRML file in your browser):
Lookin' good, baby ! However, if in your case you feel that the tunnel looks too thin, you can use a little trick. This is to expand the mask a few times, which will make the tunnel too big of course. However, after that you take a logical BUTNOT with the original protein surface. This guarantees that the tunnel will be the complement of the (solvent accessible) surface:
 ----- EXAMPLE ----- EXAMPLE ----- EXAMPLE ----- EXAMPLE ----- EXAMPLE -----
 MAMA > exp oldmask
 MAMA > exp oldmask
 MAMA > butnot oldmask cavm1
 ----- EXAMPLE ----- EXAMPLE ----- EXAMPLE ----- EXAMPLE ----- EXAMPLE -----
Now, do still not quit from MAMA just yet. Since the grid for the mask is much too big now, reduce it so it fits more snugly around the tunnel. This will reduce the maks file's size and will speed up mask I/O in MAMA and O:
 ----- EXAMPLE ----- EXAMPLE ----- EXAMPLE ----- EXAMPLE ----- EXAMPLE -----
 MAMA > new same oldmask
 MAMA > new pad 10 10 10
 MAMA > new unit final oldmask
 MAMA > wr final final.mask
 ----- EXAMPLE ----- EXAMPLE ----- EXAMPLE ----- EXAMPLE ----- EXAMPLE -----
Okay, now you may quit MAMA ;-)
This is an optional step, that can be carried out quickly with MAPMAN. You can read masks directly into O, but if you want to render the tunnel as a semi-transparent surface, for instance, you need to treat it as a map:
 ----- EXAMPLE ----- EXAMPLE ----- EXAMPLE ----- EXAMPLE ----- EXAMPLE -----
 MAPMAN > re m1 final.mask mask
 MAPMAN > mappage m1 final.map
 ----- EXAMPLE ----- EXAMPLE ----- EXAMPLE ----- EXAMPLE ----- EXAMPLE -----
Read your molecule and your tunnel-map into O and produce pictures to please your boss.
 ----- EXAMPLE ----- EXAMPLE ----- EXAMPLE ----- EXAMPLE ----- EXAMPLE -----
sam_at_in cbh1.pdb cbh1
read lefth.odb
@yasspa.omac
 As4> Which molecule ? cbh1
 Util> Object name ? yas
ce_zo cbh1 a1 a434
map_file final.map
map_obj tunne
map_par
 Map> Define box size [ 12.0 12.0 12.0]: 100 100 100
 Map> Define contour level [ 40.000]: 0.01
 Map> Colour? [yellow]: maroon
 Map> Define map intensity, fore & aft [ 0.50 0.00]: 1 0.1
 Map> Define line type [1]: 5
ma_ac
ma_dr
 ----- EXAMPLE ----- EXAMPLE ----- EXAMPLE ----- EXAMPLE ----- EXAMPLE -----
