Capillary change
How to replace capillary pod
Capillary pod can be replaced only if Sample Exposure Unit is at room temperature!!!
If not the new capillary can immediately break!!!
Capillary is glued inside the metalic pod which is designed to keep vacuum around the capillary and allow any liquid to be loaded in and out.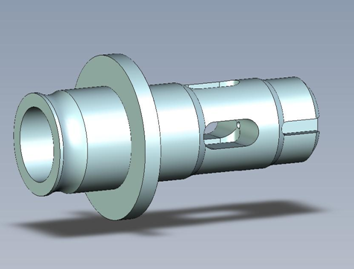
If the capillary is dirty, leaking or broken the whole capillary pod should be replaced by a new one. The clean pods (as well as the used ones) can be found in the white cupboard on the right in the experimental hutch. Just open its upper door and took a pod from the paper box. You can leave there the old capillary when noting clearly on it BROKEN/DIRTY etc.
How to proceed:
- Sample Changer: Allow critical alarms (if not, in the case of vacuum trip, SC will not work);
- separate Sample Exposure Unit from other beamline elements under vacuum and put it at the athmospheric preasure(if not already done automatically, because of a leak). In Beamline tab on BsxCuBE, switch to expert mode and click on "SC air" button. Alternative method: Close RV5 and RV6 in the jvacuum application and open exsc in the pumpgui after that;
- separate the capillary pod from in- and out- coming sample changer tubings and take it out from Sample Exposure Unit:
- unscrew the tube from the pump at the back of the Sample Exposure Unit: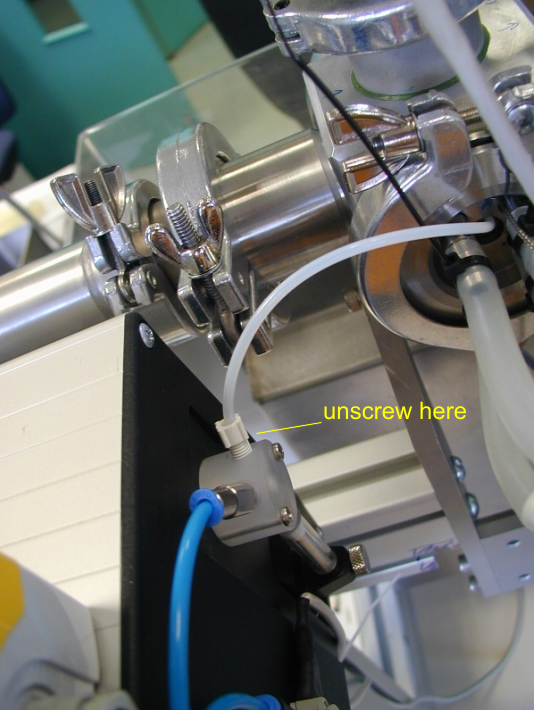
- unscrew the tube towards the needle on the front of Sample Exposure Unit:
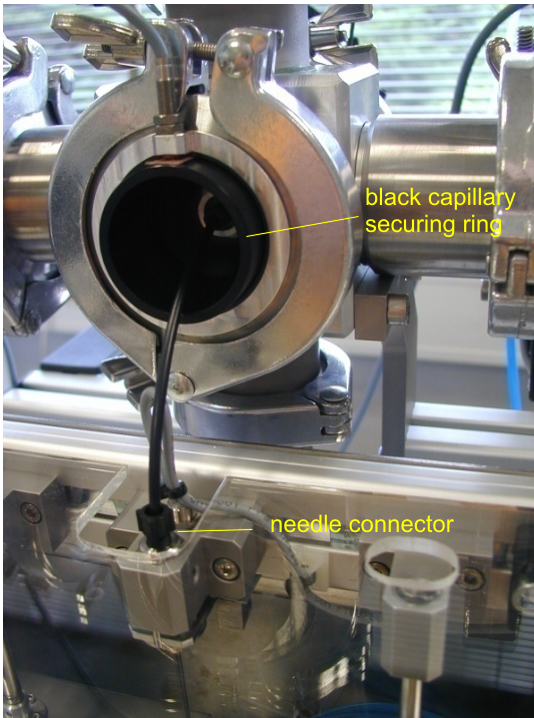
- unscrew the black capillary security ring
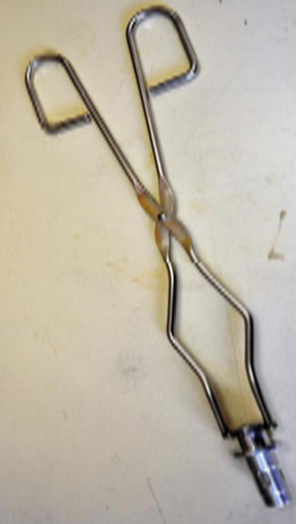
- remove capillary using the special "capillary pod" tongs attached to Sample Changer by a wire and put it in the white cupboard on the shell clearly marked as a broken/dirty capillary;
- replace new capillary pod when orienting its alignment notch upwards, make sure that vacuum seeling black plastic ring is there and well placed;
- screw back the capillary securing ring and reconnect both tubing from the back (pump side) and front (needle side);
- clean capillary with a normal cleaning cycle of the Sample Changer, watch well how well behavoiur of capilary internal walls when cleaned and for any potential liquid leaks;
If internal capillary surface shows inhomogeneities, bubbles as covered by an oil substance don't put X-rays on it!
The capillary has to be super-cleaned before!
Super-cleaning: solution (Hellmanex at 30%) at 50ºC loaded as a sample (50 microL) and used to wash capillary (arrows in/out in SC soft) during 10'. Warning: never leave a liquid in capillary when heating or cooling it.
- in BsxCuBE Beamline tab click on "Smart Vacuum" button. If for some reason this automated script doesn't work put vaccuum manally using PumpGui (icon on right nela display): close both exhaust (flight tube and SC), open both pumping valves (if flight tube also on air as SC), put pump ON. After a while (when vaccuum treshold for safety valves reached, 5x10⁻¹ mbar) you can open RV5 and RV6 (in vaccuum appli, left nela screen). Than close two small pumping valves and put pump OFF. If vacuum in flight tube still quite good, open only valve to SC and when both vacuum readings (flight tube and SC) are about the same, only than open pumping valve to flight tube if necessary.
If the vacuum doesn't reach the correct level in the Sample Exposure Unit or/and Flight tube (<3x10⁻¹ mbar) the reason can be that capillary is leaking and should be replaced once again or you produced a leak by mismounting (for example forgotten plastic ring on the pod) the new pod: repeat procedure from "SC air" action with a new or better mounted pod.
You can monitor vacuum readings at the leftmost Balzer in the technical cabinet (B1 is the SEU and B2 the flighttube).
Water calibration and BSA standard sample have to be re-done as the sample exposure container (=new capillary pod) you have just put will certainly provide slightly different (particularly if new capillary has different diameter than the previous one) I0 intensity and will consequently faults the sample molecular weight estimation.
- Turn critical alarms in the sample changer on;
- If changing capillary diameter, log in as Administrator on the sample changer software (), go to Device-Sample path menu and choose the right Capillary size ("Normal" for 1.8 mm capillary, "Small" for 1 mm one). Swap back to normal user;
- Calibrate the flow path in the "Advanced menu" of the SC;
- Check the 2D scattering pattern. Occasionally, it might be necessary to adjust the slits (in BsxCuBE) and/or the position of the capillary in spec (motor sz for capillary height).
partners


European Synchrotron Radiation Facility - 71, avenue des Martyrs, CS 40220, 38043 Grenoble Cedex 9, France.