ESRF backup software
This software allows you to backup your data in a synchronised mode during your experiment. It is installed on a dedicated backup computer (which is equipped with a fast optic fiber to the central storage system) on all MX beamlines.
| Beamline |
Backup computer name |
|---|---|
| ID23-1 | pc231data |
| ID23-2 | barvezan |
| ID29 | id29backup |
| ID30A-3 | massif3backup |
| ID30B | id30b-data |
Quick links:
Start your backup
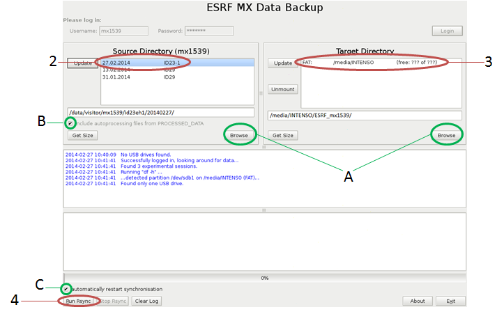
First, plug your USB drive in the USB2 or USB3 port. It will be automatically mounted
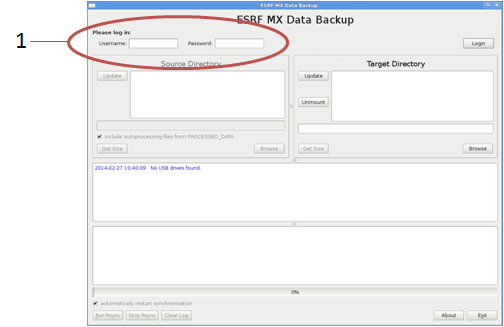
1: Log in using your proposal number and password
2: Select an experiment
3: Select a USB drive (You might need to click on “Update” in the MX backup window to see the drive)
4: Start the synchronisation by clicking on “Run Synch”
Other options:
A: You may change both the source and target paths, either by clicking on browse or by manually editing the lines.
B: If ticked: files in PROCESSED_DATA that correspond to the selected subdirectory of RAW_DATA will be included in the backup.
C: If ticked: Rsync will restart continuously to ensure that the backup is up-to-date.
Check that your data was backed-up properly
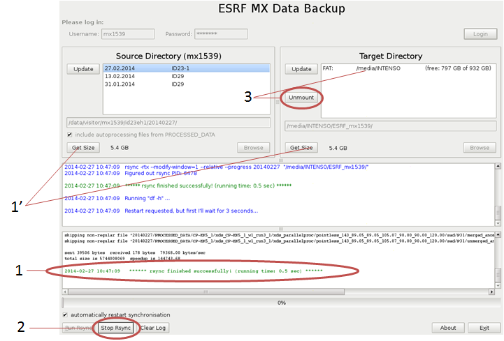
1: Rsync finishes with a green message: "...finished succesfully..."
1’: Click on "get size" buttons in the source and target areas to compare the actual sizes
NB : You can use the icon on the desktop to view the contents of the drive
Stop the backup
2: Click on “Stop Rsync”
3: To remove your USB Drive:
Select the drive in the Target Directory section (becomes highlighted in blue), and click on “Unmount”
partners


European Synchrotron Radiation Facility - 71, avenue des Martyrs, CS 40220, 38043 Grenoble Cedex 9, France.